Ask Erica: Cheese-free Appetizers Please!

Ask Erica

Hey Erica!!

Loving your new blog, hope you are enjoying life in Chicago!!

Question for you: I know you remember my deep, deep disdain for all things cheese. Whenever we have people over to hang out for game night, or get invited to a party, I ALWAYS end up making an appetizer I won’t eat. Whether it’s a buffalo wing dip, a cheese and crackers platter, bacon tomato cups, they ALL have cheese. I’m sick of making things everyone else compliments while I eat my plate full of plain potato chips, dying for the main course.

Do you have any recipes or inspiration for CHEESE-LESS hot appetizers or hors d’oeuvres? Help!

Thanks 🙂

-Kristen (a.k.a. Pek)
_________

Hi Pek,

First of all, let me apologize to you and all my lactose intolerant (and cheese hater) fans out there. I have this crazy obsession with cheese and sometimes I forget that many of my readers simply can’t/won’t eat it. Looking back, I realize that the majority of my recipes are heavy on the cheese, eek!

Thanks for helping me realize that…

Now, normally I’d give you 3 cheese-free recipe ideas and call it a day, but since I kinda messed up and alienated you for the past couple of weeks, how about I double it to 6!

Here we go…

1Pigs in a Blanket: One of my favorite appetizers in the world are hotdogs wrapped in flaky dough (informally called “Pigs in a Blanket”). This appetizer will surely make cheese lovers forget that it’s not there.

You can buy them frozen, or make them just as easy on your own. To make on your own, buy mini hotdogs (or cut up larger ones) and some crescent dough. Place the hotdog on a triangle of crescent dough (its already pre-cut) and just roll it up (roll from biggest to smallest side). Serve with honey mustard, ketchup or whatever you think would taste good for dipping!

Pigs in a Blanket

Pigs in a Blanket
Photo Credit: Pillsbury.com

2) Asian Lettuce Cups: Not only is this appetizer cute, it’s super simple to make and always a crowd pleaser. To make these, simply cook up some ground chicken, onions, peppers, water chestnuts in your favorite asian flavored sauce. Fill up lettuce cups (just the inside leaves of a head of iceberg) with the chicken mixture and top with thinly sliced cucumbers, crumbled cashews and some rice noodles. YUM!

Asian Lettuce Cups

Asian Lettuce Cups
Photo Credit: Kitchendaily.com

3) Mini Chicken and Waffles: This appetizer is one that I recently posted on a previous post. Basically all you do is take little Eggo waffles and place a piece of bone-less fried chicken on top. I like to make my own honey mustard maple syrup (literally mix honey, mustard and syrup together) and drizzle it over the top. Totally cheese-free and totally delish.

Mini Chicken & Waffles

Mini Chicken & Waffles
Photo Credit: mintlovesocialclub.com

4) Deviled Eggs: I know you said hot appetizers, but these are one of my favorite party snacks (so I had to throw it in)! I know they can be tedious to make, but follow my “The Easiest Way to Boil and Peel Eggs” post and it will make it much easier!

When I make deviled eggs, I always experiment with different flavors. Right now, my favorite is truffle. They are super simple to make too! Simply add a little truffle salt or oil to your regular recipe and that’s it! To make them extra special, you can place a tiny piece of chive on each one or even a little piece of shaved truffle (if you don’t mind spending a little bit more).

Deviled Eggs

Deviled Eggs
Photo Credit: forkknifespoon.wordpress.com

5) Bacon-wrapped dates: This ooey goey , sticky appetizers is one of my favorites and only 3 ingredients: pitted dates, bacon and almonds. To make them, just make a tiny slit in the date and stuff the almond in. Wrap the whole thing in bacon and put under the broiler for 10 minutes until brown and crispy!

Bacon wrapped dates

Bacon Wrapped Dates
Photo credit: allrecipes.com

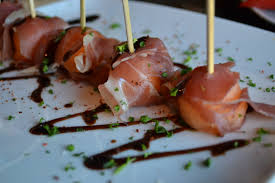
6) Prosciutto wrapped melon: This is another simple appetizer that doesn’t take a ton of time or ingredients. For these I take a melon baller and get little circles from the fruit, wrap them in prosciutto di parma and then drizzle them with a balsamic reduction.

Prosciutto Wrapped Melon

Prosciutto Wrapped Melon
Photo Credit: Thisaustinlife.com

Well Pek, I think I’m officially over cheese after realizing how many delicious things I can make without it! I hope this  post helps and you don’t go hungry at your next get-together!

Love always,
Erica


Ask Erica: How to Remember Great Restaurants

Ask Erica

Hi Erica,

I love finding new favorite restaurants. I try getting cards from places I enjoy to eventually go back or if I want to recommend them, but if anyone asks me where to go for brunch/lunch/dinner, my mind goes blank.

How would you suggest I keep track of amazing places?

-Gabriel

_________

Hi Gabriel,

I can totally sympathize with you! Since I’m a huge foodie, people typically ask me where to go and it’s hard to keep track of all the great places I go. 

I think I may be able to help and have found two ways that work for me:

1) Every time I go to a great restaurant, I usually snap a photo of the menu (with the name of the restaurant on it) or take a picture outside of the sign with my phone. Then, I create photo folders on my cell to store the photos by city (or you could store by cuisine if you don’t get asked about multiple cities)!

For example, when someone asks me where to go in Boston and I go blank, I pull out my phone, find the Boston folder and start rambling off places. As a bonus, if I took a photo of the menu, I can even text it to whoever is asking me!  🙂

2) If taking photos aren’t your thing, that’s ok! Just keep a note in your phone and when you have a great meal, write down the name of the restaurant. I would do a different note for each city (or cuisine) so you don’t get confused. 

As another bonus, write down your favorite menu item next to each restaurant. In addition to providing a great restaurant recommendation, it’s always nice to tell someone about the menu highlights as well!

I hope these two tips help! Let me know how it works for you.

Love always,
Erica

Ask Erica: But…you said your BF was a Vegetarian?

Ask Erica

Hi Erica,

It is confusing that you referred to your boyfriend as a “vegetarian” and devoted a whole post to vegetarian food, but then have a post from a few days before where he was “craving” chicken pot pie….?

I am all for showing you eat and enjoy a great deal of food, but if you’re going to write a food blog, be consistent about what you say.

-“N”
_________

Hi “N”,

First of all, I am so sorry you decided to remain anonymous. I always like to address my readers directly!

In fact…your question is actually great and I am happy to provide clarity.

Dan, my boyfriend, is a vegetarian about 95% of the time. His reasons for doing so are moral and he does the best he can to stay away from meat. That being said, he does enjoy the flavor of chicken and has a weakness for it every once in a while (especially fried chicken and chicken flavored foods…like pot pie).

It used to bother me a lot, because I felt like he was only a vegetarian when he wanted to be and it didn’t make sense to me. One day, I asked him about it and he said that he didn’t like the idea of eating meat morally and would only do so if he knew he would really, truly enjoy what he was eating (apparently that is how he justifies it),

Do I agree with it, not totally, but what can I do? At the end of the day, I wish he ate meat (because it would make my life easier), so if he wants a chicken pot pie, you bet I’m making him one!

It’s a little weird, but it’s who he is and I love him. As long as he doesn’t judge other people for eating meat (which he doesn’t), I can’t hold it against him. We all have our quirks, right?

I hope I cleared up any inconsistencies you saw! When I originally started this blog, I thought only friends and family would read it. Since it’s begun to catch on, it’s clear I need to explain my situations a little bit better! 🙂

Love always,
Erica

Ask Erica: Pot Luck Dinners

Ask Erica

Hello Erica!

A friend passed me your blog and I have been following it for some days now. I love it!

I wanted to ask you for some advice: I keep organizing potluck dinners, but still can’t figure out a way to ask people to bring a dish and that it all “makes sense” at the end without sounding pushy.

How can I create a flexible, yet awesome menu for a potluck?

The previous times I have organized one, it just seemed to be all over the place (onion soup, empanadas and carrot cake for dinner)… just a mess! Thanks in advance!!

-Abraham
_________

Hi Abraham,

What a great question! 

I think that the best way to do a potluck dinner is to pick a theme ahead of time. Whether it’s “Italian”, “Mexican”, “Asian” (or whatever you choose), everyone will know the boundaries because the theme sort of sets them. 

I think a theme allows flexibility because it gives your guests a realm to work in, but doesn’t tell them exactly what to make.

Another tip would be to have a google doc for all party attendees so that they can write down what they are cooking (that way there is no duplicates and you can sort of ensure there is a wide variety of appetizers, entrees and desserts). 

For example, someone may see the document, notice no one has signed up for a dessert and then opt to make one (and you didn’t have to say anything)!

I hope this helps! Thanks for reading and writing in. Let me know how your next potluck dinner goes!

Love always,
Erica

I want YOUR Feedback!

I want you for feedback

Photo Credit: http://www.poach.com

My blog is a little over a week old and I want to know what you think!

Ultimately, I want to write content that you enjoy. Please help me by filling out the poll below. This will help me to better understand where to focus the majority of my efforts!

Have another idea? Let me know in the “other” section. I truly value my readers thoughts, ideas and feedback. 🙂

Restaurant Review: Sunda

Sunda Logo

Photo Credit: http://www.sunda.com

Location: 110 W Illinois St  Chicago, IL 60654

Yesterday, one on my friends , Asha, who I hadn’t seen in 5 years told me that she was stopping through Chicago and wanted to grab dinner. Since she had never been to Chicago, she gave me 3 guidelines on choosing a restaurant:

1) It had to be one of Chicago’s best
2) It should be asian food (since that’s her favorite cuisine)
3) They had to have a great lounge area so we could meet one of our other friends afterwards for a drink

Enter, Sunda.

I had heard a lot about this place and had been dying to try it! This seemed like it was the perfect opportunity to check it out and I am so glad that I did.

Food Review

First of all, I want to start by saying that this may be one of the largest menus I’ve ever seen. To be honest, usually extremely large menus overwhelm me and make we worry that the food isn’t top notch (because they are spreading themselves to thin). Within five minutes of sitting down, the waitress came over, acknowledged that the menu was large and walked us through section by section. I instantly felt at ease.

The Appetizers:

Sunda Steamed Buns

Sunda Steamed Buns

1) Sunda Steamed Buns ($11): I am literally still dreaming about these. This dish is kind of like the asian version of a pulled pork sandwich. The bun is a traditional steamed bao bun and filled with crispy (yet so tender and moist) pork belly. It’s covered in a succulent hoisen sauce and topped off with a little pickled veggie slaw. They come in a duck version as well that I guess I will have to try next time! Do your self a HUGE favor and order these buns.

2) Grilled Spare Ribs ($15): You won’t find these fall off the bone spareribs ribs at your traditional Chinese restaurant. These ribs are super thin cut (still attached to the bone), but barely holding on because of how tender they are. If you love meat, I don’t think you can go to Sunda without trying these.

3) Ohhkoy Fritters ($10): One of my favorite appetizers in the world is the Bird’s Nest from Trader Joes (here is the only review I could find on them). Well this appetizer far exceeds the boxed version (which I didn’t think was even possible). This tempura fritters are made up of super thin kale, carrots, zucchini, sprouts, ginger and coriander.  Just check out the picture below to see this masterfully designed dish.

Ohhkoy Fritters

The Ohhkoy Fritters

The Sushi:

1)  Spicy “Tale of Two Tunas” ($16): This dish is truly a tuna lovers paradise. With yellowfin, pickled jalepeno, spicy mayo and fried shallots, how can it possibly be bad?

2) Lobster and Wagu ($21): I know what you’re probably thinking, $21 for a sushi roll?!? Listen, you have the most decadent lobster paired with one of the worlds best steaks. If you love surf and turf, this roll is worth every penny. Oh an did I mention it has a truffle-foie aioli?

3) Firecracker ($14): This was probably the most unique roll I had. Basically, it was a spicy tuna roll jazzed up. It was layered with cream cheese, jalepeno and water chestnuts. It was tempura fried and then topped with chili threads, unagi sauce, spicy mayo and MORE tempura crumbs. Yum!

Sunda Sushi

Dessert

1) Mochi Ice Cream ($10): I have to be honest, I don’t typically order dessert at asian restaurants. This all changed when I saw that Sunda had mochi ice cream on the menu. If you don’t know what this is, its essentially like a fluffy (but kind of sticky) dough, dusted with an unflavored white powder and wrapped around ice cream. If you like ice cream, this takes it to an entirely different level.

Normally, if places have this on the menu, you choose one flavor. At Sunda, they give you 5 FLAVORS: vanilla, red bean (just try it, it’s delicious), green tea, strawberry and mango. They are served with three delicious sauces (carmel, chocolate and strawberry). This was one of the most innovative presentation of a traditional asian dessert that I had ever seen.

Sunda's Mochi Ice Cream

Sunda’s Mochi Ice Cream

Overall

Overall I have to give my experience at Sunda an A+. Not only was the service, ambience and food exquisite, but I literally walked away with not a single complaint. With a menu that large, I figured they had to screw up somewhere! I’ll have to head back soon and see if I can catch them with a bad dish next time (although I doubt I will) 🙂

Love always,
Erica

Restaurant Review: Mastro’s Steakhouse

Price: $$$$ ($50 and up per person) Last weekend, my boyfriends parents came to town to visit us from Boston. For most people, this situation would probably drum up tons of anxiety and ensue a potentially uncomfortable situation. However, I am one of the lucky ones who have the most incredible “dating in-laws” (yes I made that up) that you can ever imagine. These people are truly my second family and I couldn’t have been more excited to have them in town! 🙂

Dan’s Mom is a huge foodie, and asked me to plan the weekends dinners. Instantly, I knew I had to take them to Mastro’s. I had heard really great things about the place, but hadn’t gotten around to trying it yet. That being said, Saturday night we headed over to there and now I’m going to tell you what I thought!

Food Review: 

Here is what we ordered and some feedback on each of the dishes:

www.foodspotting.com

Ahi Tuna Tartare
Photo: http://www.foodspotting.com

1) Ahi Tuna Tartare: This dish was literally incredible. Not only was it some of the freshest tuna I’ve tasted, but it was beautifully layered with avocado and crushed wontons (for texture). It was topped with a delicious sauce so complex in flavor, it is difficult to describe. It will be the best $17 you can spend on tuna, I promise.

2) Caesar Salad: I’m sort of a caesar salad snob and I have to say, this one really didn’t meet my expectations. I don’t love caesar dressings that have a heavy “anchovy” flavor , and this one definitely did. If that’s your thing, then by all means order it, but I can’t endorse this one. At $12…you can skip it!

3) French Onion Soup: Wow. This dish deserves a standing ovation. It’s crazy how a soup as simple as french onion could send my taste buds to another galaxy. The soup was rich and full of a deep beef flavor (they are a steak house, so it makes sense) and topped with delicious bread and so much cheese, it was a meal in it of itself!

Insider tip: If you are on a budget, but want to check out Mastros, head over to the bar area one night  and just order this soup. Not only will it be one of the best soups of your life, it will totally fill you up and only cost you about $11 :).

4) Hamachi with Crispy Onions: Now normally I’m not the biggest hamachi fan, but if you put crispy onions on anything, I’m totally going to try it. This dish was pretty simple and delicious. The fish was very fresh and the crispy onions added great texture. A little expensive (about $22), so I may not order it again.

5) Filet Mignon: So THIS is why you come to Mastro’s! This steak was probably one of the best I’ve had in my entire life. Dan’s Dad and I both got this and couldn’t stop talking about how incredible it was. The steak comes out on a plate so hot that the steak is still sizzling and cooking (picture fajitas coming out at a Mexican restaurant).

Mastro's Warm Butter Cake

Mastro’s Warm Butter Cake
Photo Credit: Ross Babel

My guess is they cook it pretty rare and it cooks the rest of the way right on the plate. At $42-48 per steak, I know it’s not affordable, but if you like a great steak, save up and try this one!

6) Creamed Spinach: When a steak is so good, who even needs sides, right?! This spinach wasn’t my favorite. I don’t know if it is just my taste buds, but to me, it lacked flavor. For $10…I’d pass on it.

7) Asparagus: Another lackluster side. I had it grilled and I just wasn’t totally impressed. There wasn’t really anything bad about it, but for $11, it wasn’t anything special either.

8) Warm Butter Cake: Holy deliciousness. I physically don’t think I’ve ever tried a better dessert in my entire life. Since I eat more than the average person (I’m not proud of this lol), that’s a pretty incredible compliment. This cake is truly indescribable (I could try, but probably wouldn’t do it justice) and you’ll just have to head down to Mastro’s to try it out for yourself!

Decor Review:

This place is pretty amazing! It’s a true mix of “traditional steak house” with a modern, trendy twist. It’s dimly lit and is definitely one of Chicago’s hot spots.

The bar area is surely somewhere I’d go back to and hang out. They had amazing live music, delicious cocktails and a fun atmosphere!

Verdict:

Do yourself a favor, if you love steak, great seafood and mind-blowing deserts, save up a little and head over to Mastro’s Steakhouse on 520 N. Dearborn Street in Chicago’s River North Neighborhood.

Have you been to Mastro’s? What do you think? Do you have any other favorite steak restaurants in Chicago?

Love always,
Erica

5 Tips to get FREE Stuff When You Go Out

If it’s one thing I know well, it’s how to get something for free (or at a heavy discount). Every time I go out with my friends, they are always asking me how I end up getting things for free. I’ve decided, it’s finally time to share my secrets so that you can find yourself enjoying some free stuff next time you go out!

I’m going to keep the names of the restaurants/stores private so that no one gets in trouble!

1) Ask for it.  This may seem too simple, but in reality, no one does it and it really does works! For example, not long ago I was at donut shop with one of my friends. Instead of simply ordering my donut and leaving, I asked the guy working “Is it buy one get one free today?” He looked at me like I was a little crazy (I’m used to that though) and said it wasn’t, but I could have a free donut since I asked.

This isn’t a unique experience either. Last month I was shopping at one of my favorite stores in Chicago. I fell in love with this sweater, but it was $180 (and that just wasn’t happening). I told the sales lady I wanted the sweater, but could only afford $100. She said it wouldn’t be a problem and somehow managed to take 45% off the sweater for me at the register.

Now, I’m not saying this always works, but one motto I live by is, “It never hurts to ask.” The worse someone can say is no! Also, you have to be fine with taking rejection or dealing with odd looks. I totally am, but I understand if you’re not. Thats why I have 4 more tips for you :).

2) Go towards the end of the day. A lot of times, if you head to a restaurant towards the end of the day, they will be getting ready to throw out a lot of food. For example, I went over to a sandwich shop around 8:00 at night. I knew that they only use fresh bread every day, so I asked them if I could have a few extra pieces to take since they were going to toss it anyways. Without hesitation, one of the girls filled up a huge bag full of this delicious bread for me. I took it home, chopped it up and froze it for quick and easy croutons whenever I needed!

3) Have a conversation/become friends with whoever is serving you. This is an easy one and probably the most successful in terms of how often it works. All you have to do here is strike up a true and genuine conversation with whoever is waiting on you.

For example, the other day I was at a local farmers market and there was a delicious (but expensive crepe stand). While ordering my crepe, my boyfriend and I began chatting with the guy cooking. We asked him about his life, family and his passion for crepes. I talked to him about my passion for food as well! After about 5 minutes of talking with him he said we HAD to try his dessert crepe and started making it for us to try…for FREE!

4) If you live in Chicago, use the app “Freebie”. This app is pretty cool! Basically, it “allows users to access goods, services and experiences around Chicago for free, while helping businesses gain traffic, awareness and loyalty”. Essentially, the app tells you which businesses are willing to give you things for free in exchange for your tweet or Facebook post about it. The more social media friends you have, the more that Freebie gives you access to great deals!

To learn more about this app, click here.

5) Start a blog. This one I just recently realized (obviously). The instant you start writing a blog and people start following it, people want to give you free stuff so that you will write about it! Word of caution though…stay true to yourself. Don’t give in and write good things about something you don’t believe in just because you’re getting it for free. You will lose credibility and then no one will want to hear what you have to say!

Well, that’s all! I hope you can take something away from this blog post. Let me know if any of my techniques worked for you 🙂

Love always,
Erica

Erica’s QUICK Chicken Pot Pie

Chicken Pot Pie

Photo Credit: closetcooking.com

Yesterday was the first day that I felt “winter” coming in Chicago. I know what you’re probably thinking…”If she thinks THIS is cold, then just wait!”  Yeah…I get it, and I don’t care! If I want to be cold (and complain about it, I will). I digress…

Anyways, because it was so cold, my boyfriend, Dan, and I decided we really wanted to have something warm and comforting for dinner. He told me he had has heart set on chicken pot pie. I’ve had a long 2 weeks (with no days off I might add), so I had my heart set on takeout…but nevertheless, he won! I decided to go with my quick chicken pot pie (store bought pie dough and frozen corn/peas).

Just because it’s quick doesn’t mean it sacrifices flavor! Here is what I did:

What You’ll Need:

Chicken Pot Pie Ingredients

Chicken Pot Pie Ingredients

1 yellow onion
1/2 a cup of carrots
2 Russet potatoes
1 clove of garlic
1 large boneless chicken breast (cubed)
2/3 cup frozen peas
2/3 cup frozen sweet corn
3 cups of chicken stock
2 pillsbury pie crust
1 tablespoon butter
1/4 cup flour (you probably won’t use all of it)
2 tablespoon cornstarch
Salt/Pepper

What You’ll Do

1) Prep the onions, carrots and potatoes. Chunk up your onion and potato into medium sized pieces. Dice your carrots into smaller pieces.

Prepped vegetables for chicken pot pie

Prepped vegetables for chicken pot pie

2) In a large, deep skillet or pot, melt 1 tablespoon of butter over medium heat. Drop your onions and carrots into the pan and let them sweat out. Some people add celery to this, but I personally hate it so I omit it!

Onions and carrots sweating for chicken pot pie

Onions and carrots sweating

3) Boil your potatoes until tender. Make sure you start with the potatoes in cold water and then bring to a boil!

4.) Once the carrots and onions start to become tender (about 10 minutes), add the chicken and garlic. I recommend putting the garlic through a garlic press.

Chicken and garlic for chicken pot pie

Add the chicken and press the garlic

5) Cook the chicken until it’s almost white all around. Don’t worry if it isn’t fully cooked through since it will continue to cook in the oven.

Once the chicken is almost cooked, sprinkle with 2 tablespoons of flour. Cook the flour for 3 minutes and then add the chicken stock.  Let simmer and reduce for 5 minutes, then add corn and peas.

cooking

6) Cook entire mixture for another couple minutes (just until peas and corn are warm). If it isn’t thickening, add corn starch a little bit at a time until you reach the consistency you want. Taste and season with salt and pepper as needed. Drain your potatoes and add them. Turn off the heat and let the mixture cool for a few minutes.    

7) Roll out your store bought pie dough, press it into the bottom of a pie dish and fill with cooled mixture. Top with the top pie dough and pinch all around to seal. Cut a few holes in the top to let the steam escape.

IMPORTANT: Cover the edges of the pie with tinfoil. The edges of the pie cook faster than the rest and will burn if you don’t do this.

Chicken pot pie filled

Filled pie crust with cool mixture

7 )Bake the pie at 425 degrees for 35 minutes. After 20 minutes, take the tinfoil off.

8) Let cool for 30 minutes before enjoying!

So that’s it! From start to finish the entire recipe only takes about 50 minutes. So the next time your cold, overworked and want a quick comforting dinner, try this chicken pot pie and tell me what you think! 🙂

Love always,
Erica

Erica’s Crispy Chicken (or Eggplant) Parmesan

My Crispy Eggplant Parmesan served over spinach

My Crispy Eggplant Parmesan served over spinach

Since I can remember, it has always boggled my mind why people top their chicken/eggplant parmesan with sauce BEFORE baking it.

In my opinion, it gets soggy and just doesn’t taste very good. Growing up, every time my family would take us out to an Italian restaurant, I would always order “chicken parm with sauce on the side” (picture me at 6 years old ordering that. I knew what I wanted, even then)! It became a running joke in my family, but to be honest, I don’t think I ever expressed to them why I actually ordered it that way. Well Mom & Dad…now you know!

Anyways, a couple of years ago, I decided to take matters into my own hands and create my own version that would remain crispy and delicious! I played around with a few different recipes and finally found the perfect one.

If there is one takeaway from this entire recipe, it’s: don’t put the sauce on until right before you are ready to eat!

What you’ll need:

1 eggplant (or a couple of chicken breasts)
3 eggs, beaten
1/2 cup flour
1 cup PANKO breadcrumbs (may be too much, but there is nothing worse than running out mid-breading)
1/4 cup parmesan cheese
1 Large log Bel Gioioso fresh mozzarella, sliced thin (or whatever you find, that is just my favorite)
1 Cup of your favorite marinara sauce (I make my own and will totally share the recipe sometime)
1/2 Tablespoon Garlic powder
Olive Oil
Salt and Pepper to taste

What to do:

1) If making eggplant: Two hours before cooking, peel the eggplant, thinly slice it and lay it out on paper towels. This is called letting the eggplant “weep”. Basically, it will take all the bitterness out of your eggplant and make it super tender.

If cooking Chicken: Butterfly the chicken breasts (if you don’t know what that is…watch this video) and then pound the breasts a few times to tenderize

2) Preheat oven to 375 degrees. Then, lay out 3 large bowls. Fill the first one with flour, the second one with beaten eggs and the third one with the panko breadcrumbs, parmesan cheese, a little bit of salt/pepper and garlic powder. Don’t get too heavy on the salt yet, the cheese is pretty salty and you may not need very much.

3) Take the chicken or the eggplant, dip it in flour, then eggs and then the bread crumbs.
*Tip 1: Use tongs. This will help your hands get less dirty
*Tip 2: Make sure you really coat your eggplant/chicken with the panko. Take a little extra time and push the breadcrumbs down.

Chicken on a cooling rack Photo Credit: www.Pooramy.com

Chicken on a cooling rack
Photo Credit: http://www.Pooramy.com

4) Fill a large pan with enough olive oil to coat the entire bottom. Turn the heat on medium and let the oil heat up.

*Tip: To test if the oil is hot enough, take the back of a wooden spoon and stick it in the oil. If bubbles form around it, it’s ready!

5) Cook your eggplant or chicken. Usually about 3-5 minutes on each side. Be sure not to overcrowd the pan or the oil temperature will go down and it won’t cook properly!

6) Once cooked, place on baking sheet with a cooling rack and top with mozzarella cheese. The cooking rack is important because it will allow the heat to circulate the eggplant/chicken while it cooks and keep it crispy.

7) Put the eggplant/chicken in the oven. The eggplant usually just goes in until the cheese melts. The chicken needs a little more time to cook through  (about 15 minutes).

8) Once out of the oven, top with your favorite sauce (or keep it on the side and dip…no one will judge you). You can serve with pastas or even or sautéed spinach and garlic if you want a lower carb option, yum!

If you’re like me and just want some crispy parmesan, I hope you find this recipe helpful and enjoyable!

Love always,
Erica